React
React is a declarative, efficient, and flexible JavaScript library for building user interfaces. It lets you compose complex UIs from small and isolated pieces of code called “components”.
- React is a front-end JavaScript library developed by Facebook in 2011 for building user interfaces.
React is used to build single page applications.
It follows the component based approach which helps in building reusable UI components.
React is used for developing complex and interactive web and mobile UI.
React has one of the largest communities supporting it.
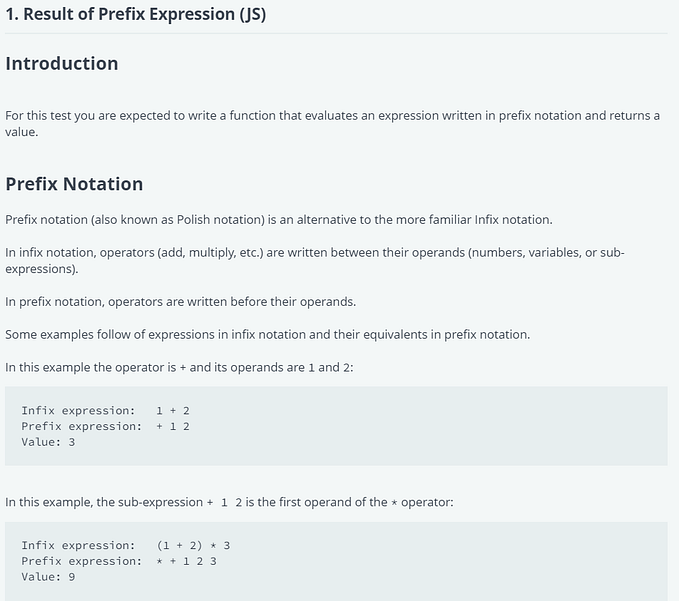
Example:
import React from 'react';
import ReactDOM from 'react-dom';class Test extends React.Component {
  render() {
    return <h1>Hello World!</h1>;
  }
}ReactDOM.render(<Test />, document.getElementById('root'));
- Install create-react-app
Install create-react-app by running this command in your terminal:
npm install -g create-react-app - Create a React application
Run this command to create a React application namedmyfirstreact:
npx create-react-app myfirstreact - Run the React application
cd myfirstreact
npm start
typelocalhost:3000in the address bar. - ES6
ES6 stands for ECMAScript 6.
ECMAScript was created to standardize JavaScript, and ES6 is the 6th version of ECMAScript, it was published in 2015, and is also known as ECMAScript 2015.
React uses ES6, and you should be familiar with some of the new features like:
. Classes
. Arrow Functions
. Variables (let, const, var) - React allows us to create reusable UI components.
Example
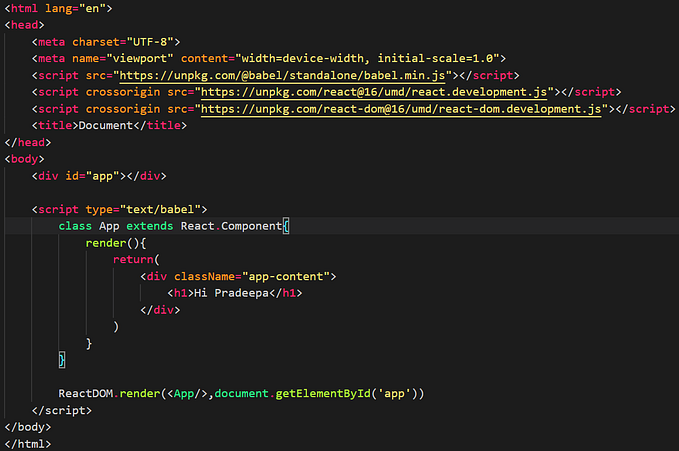
Include three CDN’s in your HTML file:
<!DOCTYPE html>
<html>
  <script src="https://unpkg.com/react@16/umd/react.production.min.js"></script>
  <script src="https://unpkg.com/react-dom@16/umd/react-dom.production.min.js"></script>
  <script src="https://unpkg.com/babel-standalone@6.15.0/babel.min.js"></script>
  <body>

    <div id="mydiv"></div>    <script type="text/babel">
      class Hello extends React.Component {
        render() {
          return <h1>Hello World!</h1>
        }
      }      ReactDOM.render(<Hello />, document.getElementById('mydiv'))
    </script>
  </body>
</html>
Render Function
The ReactDOM.render() function takes two arguments, HTML code and an HTML element.
JSX
- JSX stands for JavaScript XML.
- JSX allows us to write HTML in React.
- JSX makes it easier to write and add HTML in React.
- JSX comes with the full power of JavaScript. You can put any JavaScript expressions within braces inside JSX.
- Each React element is a JavaScript object that you can store in a variable or pass around in your program.
JSX:
const myelement = <h1>I Love JSX!</h1>;ReactDOM.render(myelement, document.getElementById('root'));
Without JSX:
const myelement = React.createElement('h1', {}, 'I do not use JSX!');ReactDOM.render(myelement, document.getElementById('root'));
React Components
- React has a few different kinds of components, but we’ll start with React.Component subclasses:
- We use components to tell React what we want to see on the screen.
- When our data changes, React will efficiently update and re-render our components.
props
A component takes in parameters, called props (short for “properties”), and returns a hierarchy of views to display via the render method.
- The render method returns a description of what you want to see on the screen.
- React takes the description and displays the result. In particular, render returns a React element, which is a lightweight description of what to render.
- Most React developers use a special syntax called “JSX” which makes these structures easier to write.
- The <div /> syntax is transformed at build time to React.createElement(‘div’)
state
React components can have state by setting this.state in their constructors.
- this.state should be considered as private to a React component that it’s defined in.
- Let’s store the current value of the Square in this.state, and change it when the Square is clicked.
- First, we’ll add a constructor to the class to initialize the state:
React Lifecycle
Lifecycle of Components
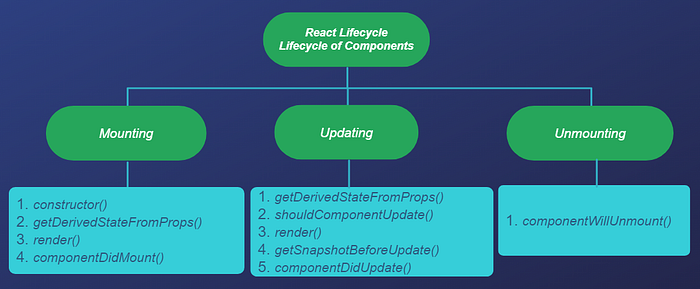
Each component in React has a lifecycle which you can monitor and manipulate during its three main phases.
The three phases are: Mounting, Updating, and Unmounting.
- Mounting
Mounting means putting elements into the DOM.
React has four built-in methods that gets called, in this order, when mounting a component:
i. constructor()
ii. getDerivedStateFromProps()
iii. render()
iv. componentDidMount()
The render() method is required and will always be called, the others are optional and will be called if you define them.
constructor
The constructor() method is called before anything else, when the component is initiated, and it is the natural place to set up the initial state and other initial values.
- The constructor() method is called with the props, as arguments, and you should always start by calling the super(props) before anything else, this will initiate the parent’s constructor method and allows the component to inherit methods from its parent (React.Component).
getDerivedStateFromProps
- The getDerivedStateFromProps() method is called right before rendering the element(s) in the DOM.
- This is the natural place to set the state object based on the initial props.
- It takes state as an argument, and returns an object with changes to the state.
- The example below starts with the favorite color being “red”, but the getDerivedStateFromProps() method updates the favorite color based on the favcol attribute:
render
The render() method is required, and is the method that actually outputs the HTML to the DOM.
componentDidMount
The componentDidMount() method is called after the component is rendered.
- This is where you run statements that requires that the component is already placed in the DOM.
2. Updating
The next phase in the lifecycle is when a component is updated.
- A component is updated whenever there is a change in the component’s state or props.
- React has five built-in methods that gets called, in this order, when a component is updated:
1. getDerivedStateFromProps()
2. shouldComponentUpdate()
3. render()
4. getSnapshotBeforeUpdate()
5. componentDidUpdate()
The render() method is required and will always be called, the others are optional and will be called if you define them.
getDerivedStateFromProps
Also at updates the getDerivedStateFromProps method is called. This is the first method that is called when a component gets updated.
- This is still the natural place to set the state object based on the initial props.
- The example below has a button that changes the favorite color to blue, but since the getDerivedStateFromProps() method is called, which updates the state with the color from the favcol attribute, the favorite color is still rendered as yellow:
shouldComponentUpdate
In the shouldComponentUpdate() method you can return a Boolean value that specifies whether React should continue with the rendering or not.
- The default value is true.
- The example below shows what happens when the shouldComponentUpdate() method returns false:
render
The render() method is of course called when a component gets updated, it has to re-render the HTML to the DOM, with the new changes.
- The example below has a button that changes the favorite color to blue:
getSnapshotBeforeUpdate
In the getSnapshotBeforeUpdate() method you have access to the props and state before the update, meaning that even after the update, you can check what the values were before the update.
- If the getSnapshotBeforeUpdate() method is present, you should also include the componentDidUpdate() method, otherwise you will get an error.
- The example below might seem complicated, but all it does is this:
- When the component is mounting it is rendered with the favorite color “red”.
- When the component has been mounted, a timer changes the state, and after one second, the favorite color becomes “yellow”.
- This action triggers the update phase, and since this component has a getSnapshotBeforeUpdate() method, this method is executed, and writes a message to the empty DIV1 element.
- Then the componentDidUpdate() method is executed and writes a message in the empty DIV2 element:
componentDidUpdate
The componentDidUpdate method is called after the component is updated in the DOM.
- The example below might seem complicated, but all it does is this:
- When the component is mounting it is rendered with the favorite color “red”.
- When the component has been mounted, a timer changes the state, and the color becomes “yellow”.
- This action triggers the update phase, and since this component has a componentDidUpdate method, this method is executed and writes a message in the empty DIV element:
3. Unmounting
The next phase in the lifecycle is when a component is removed from the DOM, or unmounting as React likes to call it.
- React has only one built-in method that gets called when a component is unmounted:
i. componentWillUnmount()
componentWillUnmount
The componentWillUnmount method is called when the component is about to be removed from the DOM.
Lifecycle of Components — Keypoints
- componentWillMount() – Executed just before rendering takes place both on the client as well as server-side.
- componentDidMount() – Executed on the client side only after the first render.
- componentWillReceiveProps() – Invoked as soon as the props are received from the parent class and before another render is called.
- shouldComponentUpdate() – Returns true or false value based on certain conditions. If you want your component to update, return true else return false. By default, it returns false.
- componentWillUpdate() – Called just before rendering takes place in the DOM.
- componentDidUpdate() – Called immediately after rendering takes place.
- componentWillUnmount() – Called after the component is unmounted from the DOM. It is used to clear up the memory spaces.
React Events
Adding Events
React events are written in camelCase syntax:
onClick instead of onclick.
React event handlers are written inside curly braces:
onClick={shoot} instead of onClick=”shoot()”.<button onClick={method}>submit</button>
Event Handlers
A good practice is to put the event handler as a method in the component class:
React Forms
You add a form with React like any other element:
Styling React Using CSS
Inline Styling
To style an element with the inline style attribute, the value must be a JavaScript object:
React Sass
Sass is a CSS pre-processor.
Sass files are executed on the server and sends CSS to the browser.